


To start with you need to stamp out your hearts in the ink of your choice, for this tutorial i have used distress ink in seedless preserves from the autumn collection, and for the flower in the previous post i used festive berries, from the winter collection.
I fill the whole sheet of A4 and keep some for another day but if you don't want to do that you need 11 hearts. Before i cut mine out i spritz them with a mica spritz (a bit of mica powder mixed with water, you can also add some ink if you wish) this is not a necessary step but i like to do it.
In 5 of the hearts you need to cut a slit up the middle, mine are abut 2cm up but you don't need to be precise!

You then need to shape the 'petals' with a bone folder, pencil or whatever you have to hand. Where you have cut the slit cross one side over the other and secure, so you end up with a petal like this...

Do this with 5 of the hearts, then you can assemble your base layer, a wet glue is best as it gives you a bit of 'moveability' i've used my craft studio paper flower expert glue, as it doesn't take long to 'grab hold'
 |
| Your first layer should look something like this |
Do the same for the next 3 petals, cutting a slither (very precise i know!!!) away from one side of the slit, this is just so you can pull the petal tighter together.

Place these 3 petals in the middle of your first layer, i find it easier to this before i glue it down just so i have an idea of where i want them placed.

For your next 2 petals you need to cut away roughly 1.5cm off the bottom of your hearts, and the cut your slit about halfway up. it is then the sam process as making the previous petals. however i found it easier to do the cross over first and then shape the petals while holding in place and then glue.

Again fix these into the centre of you flower.

To make the centre of the flower, you need to cut a spiral into your final heart, making sure you leave a small circular 'base'

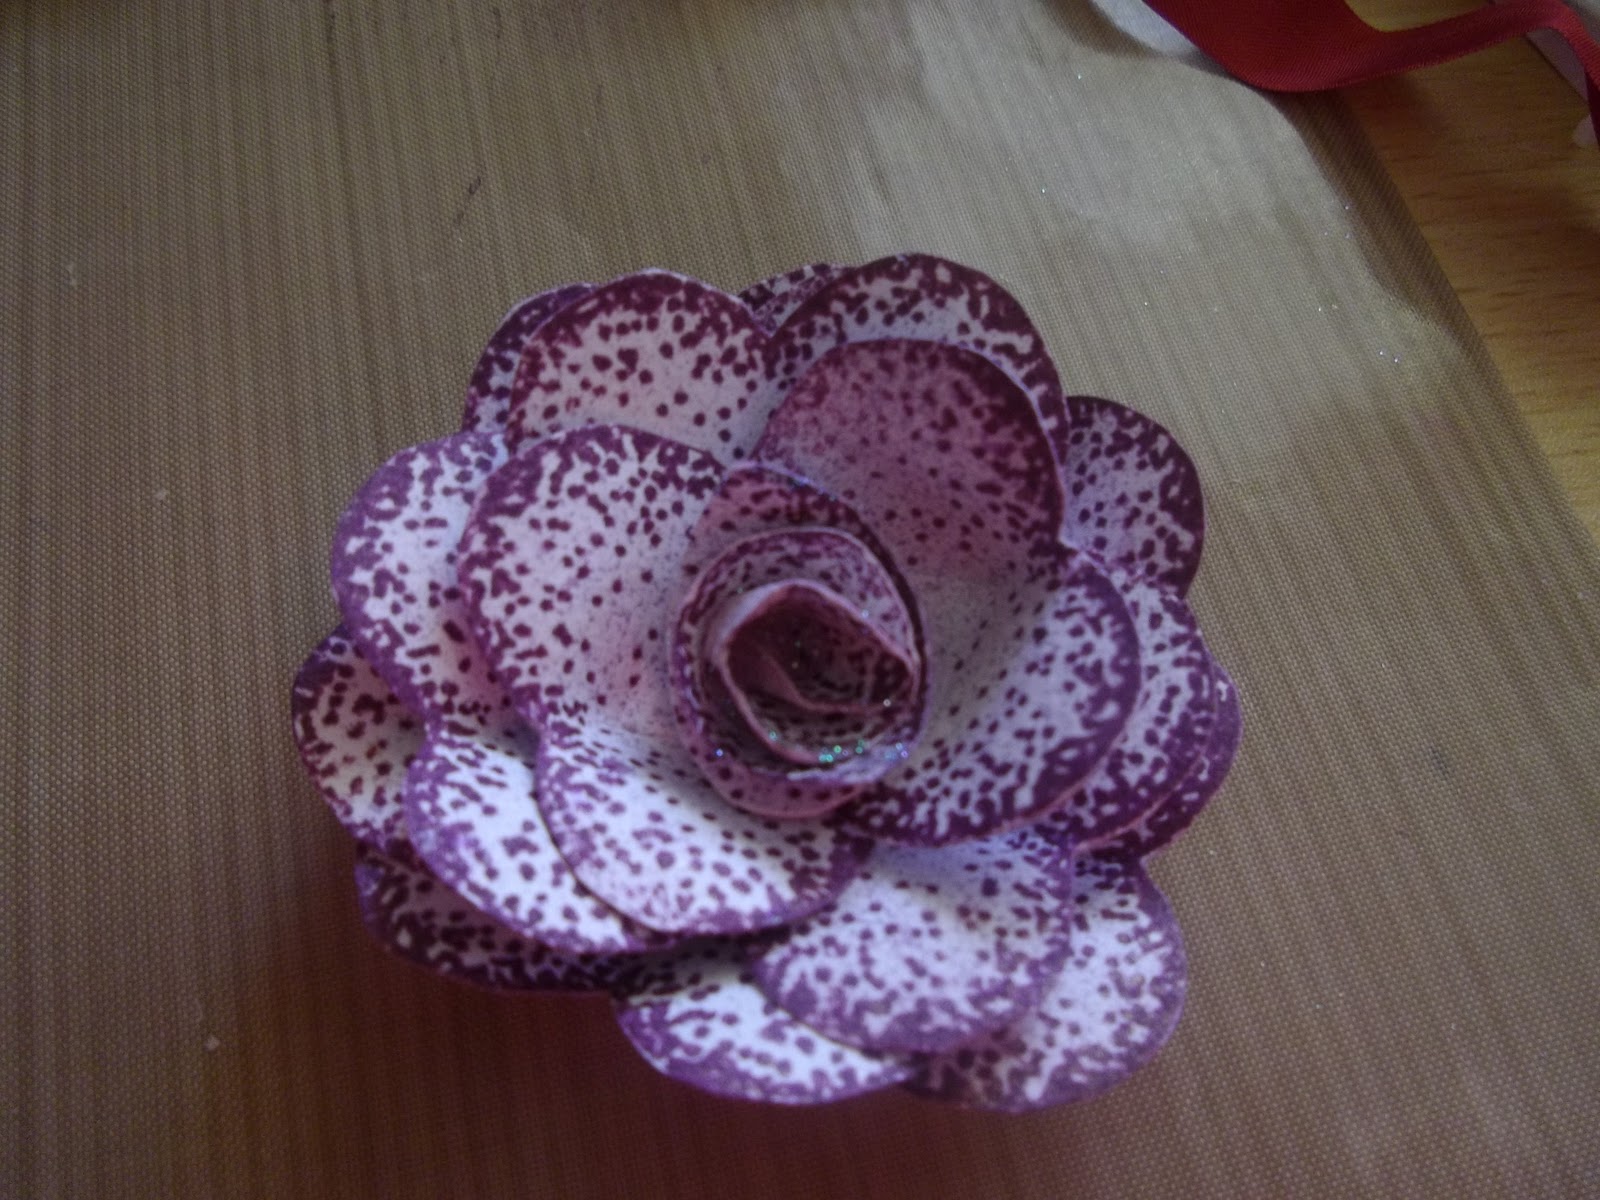 |
| The finished flower |


15 comments:
fab idea. nice and clear instructions x
fab tutorial & beautiful flowers sue xx
wow! these are gorgeous flowers. It's a very clear tutorial too, so well done! xx Jill B
Gorgeous flowers and a brilliant tutorial - well done!!
Lovely tutorial - very clear instructions - well done
Linda
fab simple easy tutorial will be doing some of these tomorro thank you so much for sharing xx
Thanks for taking the time to do the tutorial. I loved the first flower but it looks even better in seedless preserves - def going to do it using this colour (love purple) lol susiesu xxx
Great use of this stamp!
Fab tutorial, such gorgeous flowers.
Wendy xx
These look gorgeous. I,m really into making flowers at the moment so I,m going to have ago at these.xxxx
Brilliant! Many thanks, you've saved us all a lot of time and scrumpled hearts! The pics are so helpful. Thanks again.
Fab tutorial Kim, love the gorgeous flowers :-) Just leapblogging :-) Elaine-xxx-
Beautiful flowers and a wonderful tutorial...very very clear, thank you I am going to have a go at these!!! will show you the finished product on my blog soon....big hugs Sharon x
Fab tutorial, your flowers are lovely, popped over from DC
Lorna xx
Fantastic flowers Kim. I use hearts when making certain flowers too but I make them differently to this. Its great to see your way of doing it. And your tutorial is fantastic. The photos are really clear and your instructions are easy to follow. Brilliant. Lee x
Post a Comment