Welcome to my blog, Hope you like it...

I started this Blog to track my progress as I start my crafting journey. It begins with me as a fledgling crafter and hopefully ends with helping to inspire others to create.

About Me

My photo
I'm 27, married, with 3 little boys aged 7,4 and 1 and although they may keep me busy, i'll always have time for crafting!, so i'm always on the lookout for inspiration, and new ideas to try. i have just signed up as an independent demonstrator for Stampin' up! So i'm looking forward to sharing products i feel passionately about with you.

My Blog List

Search


My Boys

Followers

Christmas Projects

Christmas Projects


Thursday 18 October 2012

Better late than never!...

Well I have been a very naughty design team member this month! The new challemge at alys crafty challenges launched on the 8th of this month, and i am only just blogging about it *hangs head in shame* The theme is good ole HALLOWEEN now personally i love halloween and wish we made a bit of a bigger deal out of it over here. so obviously i wanted to create something special for this challenge, and here is what i came up with


My very own haunted house! the kitty, and happy halloween sign, are from a free digi kit from daisy trail click here to check out all their fabulous freebies. The mummy, was a freebie digi stamp from bugaboo digi stamps


The little metal star is made out of an old bangle, just cut with wire cutters and them bent into shape. The little candle is made from a button, a piece of glue stick and a piece of bakers twine. I can't take credit for that idea, I saw it on youtube, posted by the fabulous jennings644 click here for the video, definitely check her out, she posts some brilliant videos.

All the other bits are simply bits and bobs i found lying around the house (the orange fluff, & spiders are courtesy of hubbys pubs halloween decorations!!). Please do pop over and join in the challnge, i'd love to see what you create.

Sunday 2 September 2012

Up for a challenge?


Aly's crafty challenges is a new group on facebook, & I'm part of the DT!. Each month will see a new challenge set, with a fabby prize up for grabs. This months challnge, doesn't officially go live until tomorrow, but I have scheduled this post for Sunday night just to make sure I'm all ready for the morning:)

Right, on to the challenge, there could only be one theme this month...
You can enter the challenge up to three times, and you can enter any kind of crafty project you like. As this is our first month, if we get 50(or more!) enteries, Aly is going to offer up an extra prize =) Each month, Aly will also be choosing a blog of the month.


My project for the challnge is this lil backpack, made using some of my new Stampin' up! supplies, please check out my Stampin' up! blog if you're interested in which products they are.


The Template for this backpack can be found on the splitcoast stampers website, they have lots of brilliant tutorials and project ideas, so go check them out!

I hope you'll join in the challenge, I Look forward to seeing what you create.

Friday 17 August 2012

Just a fly by post ladies & gents :) (i'm not doing very well with this having 2 blogs malarky am i!?) i eanted to share with you this atc i made recently for swap i'm involved, this, in my opinion, is possibly not the best atc i've made (will scout out pics of the others for you) but i love it! Maybr its the sentiment, maybe its the simplicty, whatever it is, i very nearly kept it for myself lol :). Hope you like it, let me know what you think.
Xx


Sunday 8 July 2012

I've been very neglectful of this poor lil blog! I've been focusing on my stampin' up! blog for a while so  other crafty projects have been cast aside for a while, if you would like to see what i have been up to lately please check out my other blog www.kimstampincorner.blogspot.com i am not closing this blog as, once i get a bit of order back in my life, i do have other projects i would like to try and projects that would like to be finished. thanks to everyone that has joined me on this blog, and i will be back to it in the future but i hope you will join me on my other blog, adn enjoy some of things i have to share with you there.
xxx

Saturday 25 February 2012

Stampin' up! & a little project i'm working on...

I know i've not posted for a long while, but with, half term recently and what seems like constant illness within the family i've not had much time!!

It's not all doom and gloom, part of the reason i haven't posted recently is that i've signed up to be a stampin' up demonstrator. so i've been working on a new Stampin' up blog, facebook page, samples and class ideas etc.
I would love it if you would all join me on my new blog here i will be keeping this blog open to share all my non SU craftiness =)

So...on to my new project, and i have to give credit to my lovely hubby for this one. He bought me this ickle mini cabinet from a charity shop...

so this is now my ongoing project and this is what it looks like so far...
I think i might distress the it a bit but after that i'm not sure what i'm going to next! The outside is covered with torn pages from a dictionary and the inside is painted with acrylic paint, and the 'shelves' are boxes made from thick packaging card.
I have a bag full of charms to use in it when its ready (also courtesy of the hubby), to be honest, i just love looking at them,  so i guess this project is perfect for me, i get to keep all my fave pretty things!!

Thursday 26 January 2012

This year i will...

Start preserving my memories. I'm always bleating on about memories this, memories that! so i've made it my mission to do something about it. I've my smash book for those silly sentimental things no one but you cares about, i'm going to an art journaling class at art from the heart to get started journaling my personal thoughts& i've started doing some scrapbook pages that can be shared with everyone and be passed down the family. I've got my lil 6x6 album which had one layout in it to work on & i've actually done a couple of 12x12 layouts.
Before i sign off for now can i ask any of you who scrap, do you stick to the same colour scheme for each album or do you go with your photo(s)?


Sunday 22 January 2012

Journal/notebook cover

I don't have much to share with you this week as most of the things i'm working on at the moment are gifts so i can't share them until they have been received!
So just a simple offering today. Although this is simple, i am really pleased with this. I love notebooks and journals (& pens but thats another matter!) so i have lots of them. This one in particular was a cheapy from asda. I decided to give it a new lease of life. I painted it with acrylic paint, dried it with a heat gun (i'm impatient) then simply stamped it with the stamps of my choice. Once that was dry i then spritzed with some ink spray.
Hope you like my little offering this week.
Xxx


Saturday 14 January 2012

heart flower tutorial

A couple of people have asked me how i made my flower from the heart stamp. So I am going to share the process with you =) This is my first tutorial so please be gentle with me, and if you feel you need more detail or pictures, please do just ask.

To start with you need to stamp out your hearts in the ink of your choice, for this tutorial i have used distress ink in seedless preserves from the autumn collection, and for the flower in the previous post i used festive berries, from the winter collection.
I fill the whole sheet of A4 and keep some for another day but if you don't want to do that you need 11 hearts. Before i cut mine out i spritz them with a mica spritz (a bit of mica powder mixed with water, you can also add some ink if you wish) this is not a necessary step but i like to do it.

In 5 of the hearts you need to cut a slit up the middle, mine are abut 2cm up but you don't need to be precise!


You then need to shape the 'petals' with a bone folder, pencil or whatever you have to hand. Where you have cut the slit cross one side over the other and secure, so you end up with a petal like this...


Do this with 5 of the hearts, then you can assemble your base layer, a wet glue is best as it gives you a bit of 'moveability' i've used my craft studio paper flower expert glue, as it doesn't take long to 'grab hold'


Your first layer should look something like this

Do the same for the next 3 petals, cutting a slither (very precise i know!!!) away from one side of the slit, this is just so you can pull the petal tighter together.


Place these 3 petals in the middle of your first layer, i find it easier to this before i glue it down just so i have an idea of where i want them placed.


For your next 2 petals you need to cut away roughly 1.5cm off the bottom of your hearts, and the cut your slit about halfway up. it is then the sam process as making the previous petals. however i found it easier to do the cross over first and then shape the petals while holding in place and then glue.

Again fix these into the centre of you flower.


To make the centre of the flower, you need to cut a spiral into your final heart, making sure you leave a small circular 'base'

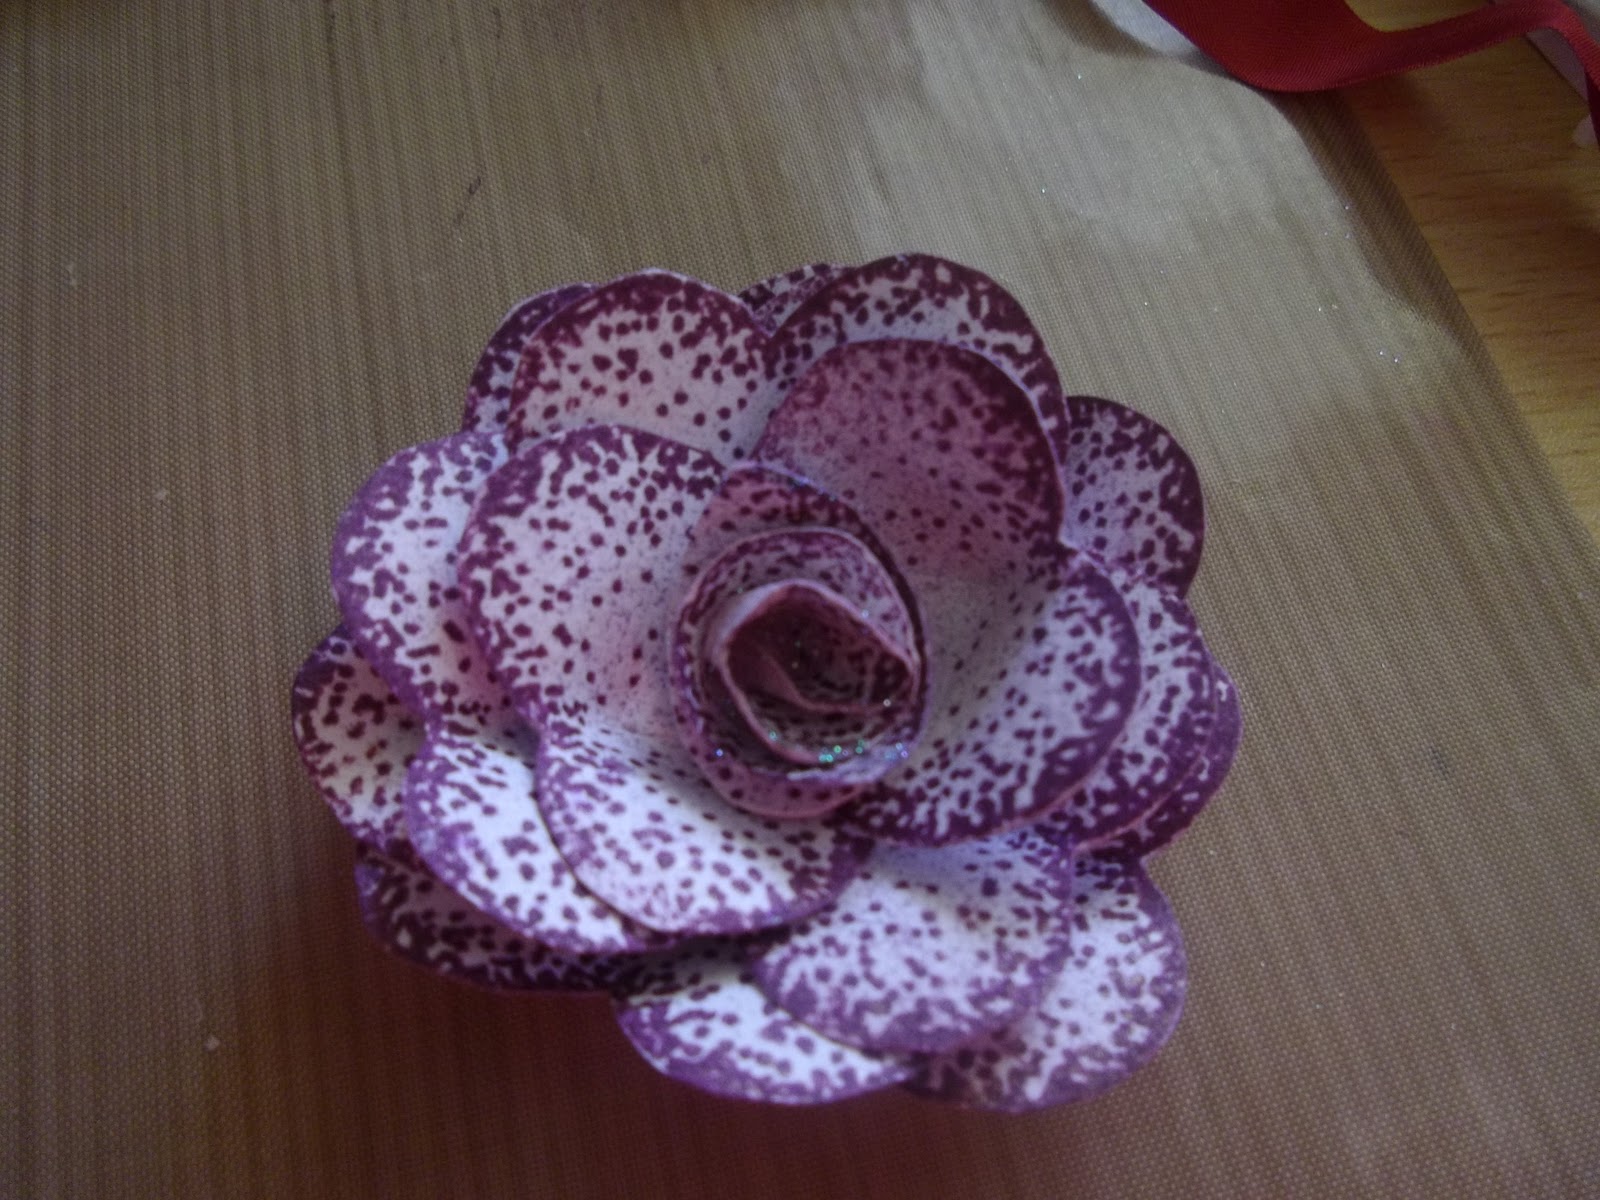
Roll it into the centre, then fix to the base you left in the middle (i used pinflair to do this), finally attach to the centre of you flower.


The finished flower
I hope you've managed to follow my tutorial, let me know how you get on. xx


Thursday 12 January 2012

Flower...

Just a quick post to test my new blogger app and to share the flower i've made with the free stamp on this months craft stamper. I'm sure most of you can figure out how to do this :) but if anyone wants to know how i did it just ask i'm happy to share :D
To be honest i think the centre could do with some work (i was trying to just use thr hearts!) if anyone has any ideas please do share.
Ttfn
Xx