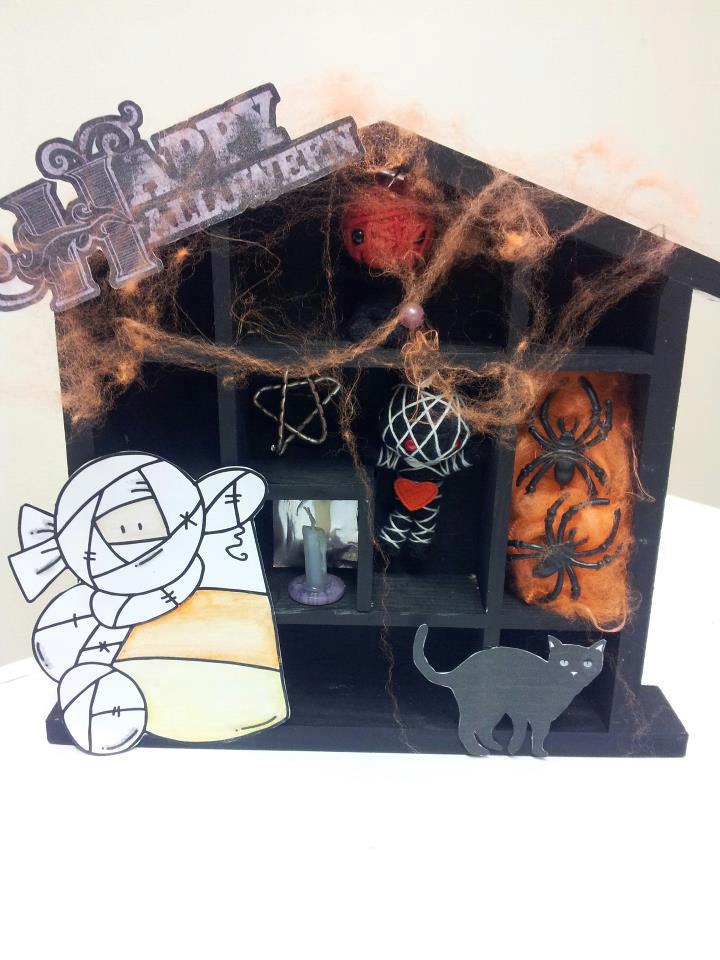
Welcome to my blog, Hope you like it...

I started this Blog to track my progress as I start my crafting journey. It begins with me as a fledgling crafter and hopefully ends with helping to inspire others to create.

About Me

My Photo
I'm 27, married, with 3 little boys aged 7,4 and 1 and although they may keep me busy, i'll always have time for crafting!, so i'm always on the lookout for inspiration, and new ideas to try. i have just signed up as an independent demonstrator for Stampin' up! So i'm looking forward to sharing products i feel passionately about with you.

My Blog List

Search

Loading...

My Boys

Followers

Christmas Projects

Christmas Projects

Saturday, 25 February 2012

Stampin' up! & a little project i'm working on...

I know i've not posted for a long while, but with, half term recently and what seems like constant illness within the family i've not had much time!!

It's not all doom and gloom, part of the reason i haven't posted recently is that i've signed up to be a stampin' up demonstrator. so i've been working on a new Stampin' up blog, facebook page, samples and class ideas etc.
I would love it if you would all join me on my new blog here i will be keeping this blog open to share all my non SU craftiness =)

So...on to my new project, and i have to give credit to my lovely hubby for this one. He bought me this ickle mini cabinet from a charity shop...

so this is now my ongoing project and this is what it looks like so far...
I think i might distress the it a bit but after that i'm not sure what i'm going to next! The outside is covered with torn pages from a dictionary and the inside is painted with acrylic paint, and the 'shelves' are boxes made from thick packaging card.
I have a bag full of charms to use in it when its ready (also courtesy of the hubby), to be honest, i just love looking at them,  so i guess this project is perfect for me, i get to keep all my fave pretty things!!

Thursday, 26 January 2012

This year i will...

Start preserving my memories. I'm always bleating on about memories this, memories that! so i've made it my mission to do something about it. I've my smash book for those silly sentimental things no one but you cares about, i'm going to an art journaling class at art from the heart to get started journaling my personal thoughts& i've started doing some scrapbook pages that can be shared with everyone and be passed down the family. I've got my lil 6x6 album which had one layout in it to work on & i've actually done a couple of 12x12 layouts.
Before i sign off for now can i ask any of you who scrap, do you stick to the same colour scheme for each album or do you go with your photo(s)?


Sunday, 22 January 2012

Journal/notebook cover

I don't have much to share with you this week as most of the things i'm working on at the moment are gifts so i can't share them until they have been received!
So just a simple offering today. Although this is simple, i am really pleased with this. I love notebooks and journals (& pens but thats another matter!) so i have lots of them. This one in particular was a cheapy from asda. I decided to give it a new lease of life. I painted it with acrylic paint, dried it with a heat gun (i'm impatient) then simply stamped it with the stamps of my choice. Once that was dry i then spritzed with some ink spray.
Hope you like my little offering this week.
Xxx


Saturday, 14 January 2012

heart flower tutorial

A couple of people have asked me how i made my flower from the heart stamp. So I am going to share the process with you =) This is my first tutorial so please be gentle with me, and if you feel you need more detail or pictures, please do just ask.

To start with you need to stamp out your hearts in the ink of your choice, for this tutorial i have used distress ink in seedless preserves from the autumn collection, and for the flower in the previous post i used festive berries, from the winter collection.
I fill the whole sheet of A4 and keep some for another day but if you don't want to do that you need 11 hearts. Before i cut mine out i spritz them with a mica spritz (a bit of mica powder mixed with water, you can also add some ink if you wish) this is not a necessary step but i like to do it.

In 5 of the hearts you need to cut a slit up the middle, mine are abut 2cm up but you don't need to be precise!


You then need to shape the 'petals' with a bone folder, pencil or whatever you have to hand. Where you have cut the slit cross one side over the other and secure, so you end up with a petal like this...


Do this with 5 of the hearts, then you can assemble your base layer, a wet glue is best as it gives you a bit of 'moveability' i've used my craft studio paper flower expert glue, as it doesn't take long to 'grab hold'


Your first layer should look something like this

Do the same for the next 3 petals, cutting a slither (very precise i know!!!) away from one side of the slit, this is just so you can pull the petal tighter together.


Place these 3 petals in the middle of your first layer, i find it easier to this before i glue it down just so i have an idea of where i want them placed.


For your next 2 petals you need to cut away roughly 1.5cm off the bottom of your hearts, and the cut your slit about halfway up. it is then the sam process as making the previous petals. however i found it easier to do the cross over first and then shape the petals while holding in place and then glue.

Again fix these into the centre of you flower.


To make the centre of the flower, you need to cut a spiral into your final heart, making sure you leave a small circular 'base'

Roll it into the centre, then fix to the base you left in the middle (i used pinflair to do this), finally attach to the centre of you flower.


The finished flower
I hope you've managed to follow my tutorial, let me know how you get on. xx


Thursday, 12 January 2012

Flower...

Just a quick post to test my new blogger app and to share the flower i've made with the free stamp on this months craft stamper. I'm sure most of you can figure out how to do this :) but if anyone wants to know how i did it just ask i'm happy to share :D
To be honest i think the centre could do with some work (i was trying to just use thr hearts!) if anyone has any ideas please do share.
Ttfn
Xx


Sunday, 11 December 2011

pages from my december journal & a gift

Just a quick post today to share the latest pages from my december/christmas journal

I didn't do much at all on the 7th so i've just been sticking christmassy things all over the page!


Also, i've finally put together my dads christmas gift!!
I've put together a diary for him, he loves music, so this paper was the perfect choice =) i've used the tim holtz winter distress inks to colour it. The letters were cut on my cricut

I use the same distress in on the inside cover and put glue onto the red covering from my sticky strip and placed it round the edges to create the effect you can see at the top of the page. My dad is always taking notes so after each month i've added 2 pages of note paper.

thats all for now, got to go and put a scrapbook kit together for my mother in law =)

xx

Wednesday, 7 December 2011

Christmas Journal

 I've seen a few people  who are journalling their december/christmas and you can join shimelles online class here http://www.shimelle.com/paper/1284/journal-your-christmas-2011-online-scrapbooking-class/ i would really liked to have joined but i can't justify the cost this year =( will definitely be signing up for next years (it will be included in the xmas budget!!)

Still working on my opening page, i want it to be a bit of a christmassy collage


So i spent me afternoon putting my own journal together. Now i'm no expert book binder so all i did was stitch some of the polka doodles ultimate graphic card together with my cover which is stampin up card stock (sorry can't think of the exact colour !). The image is a christmas freebie on tattered and inked which i printed and then inked with the new winter distress inks.


The numbers i've used for the pages can be found here they are actually in red but i printed them off in greyscale and then decorated them myself, you could still do this with them in the red as many of the designs are very 'open'

I've made too many christmas cards, so i've used one here as a pocket

My journalling may still be not be great but it's getting there and i'm trying to  just use what is around me, i don't want this to be a project full of shiny brand new products (SHOCK HORROR!!) i want it to truly represent this holiday season =)

I'm going to try and post my new pages daily (or every other day at the very least). Hopefully this will keep me on track, as this lil project is supposed to help keep the christmas stress at bay!

xxx